Home Blog Page 5

How To Change Password Google Account When Forgetting, On Android, iPhone, And More

0

As we live in an era where security breaches are not uncommon, keeping your Google account password secure and up-to-date is more crucial than ever.

Whether you’ve forgotten your password or you’re trying to change it on your Android or iPhone, or maybe you want to recover it via your mobile number, this detailed guide provides a step-by-step approach for each scenario.

Change Password Google Account

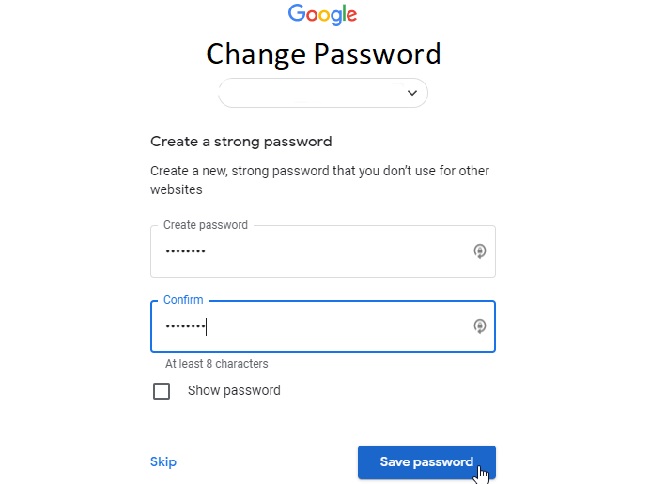
How to Change Password for Google Accounts

Changing your Google account password is a straightforward process, here’s how:

Step 1: Sign in to your Google account.

Step 2: Go to the ‘Security’ section on the left-hand side.

Step 3: Under ‘Signing in to Google,’ click on ‘Password.’

Step 4: You may be asked to sign in again for security purposes.

Step 5: Enter your new password, then select ‘Change Password.’

How to Change Google Account Password if Forgotten

If you’ve forgotten your Google account password, follow these steps to recover it:

Step 1: Visit the Google Account Recovery page.

Step 2: Enter your email address and click ‘Next.’

Step 3: Click on ‘Forgot password?’

Step 4: Google will now ask you to enter the last password you remember. If you can’t recall any, click on ‘Try another way.’

Step 5: Google will then use your recovery methods (email, phone number, security questions) to verify your identity.

Step 6: Once verified, you’ll be prompted to enter a new password.

How to Change Google Account Password on Android

Changing your Google account password on your Android device is easy:

Step 1: Open your device’s ‘Settings’ app.

Step 2: Tap on ‘Google,’ then ‘Manage your Google Account.’

Step 3: At the top, tap ‘Security.’

Step 4: Under ‘Signing in to Google,’ tap ‘Password.’ You might need to sign in.

Step 5: Enter your new password, then tap ‘Change Password.’

How to Change Google Account Password on iPhone

Changing your Google account password on an iPhone is similar to the process on Android:

Step 1: Download and open the Google app.

Step 2: Tap on your profile picture and select ‘Manage your Google Account.’

Step 3: Tap on ‘Personal info & privacy,’ then ‘Account recovery.’

Step 4: Under ‘Password & sign-in method,’ tap on ‘Password.’

Step 5: Verify your identity, enter your new password, and tap on ‘Change Password.’

How to Recover Google Account Password via Mobile Number

If you’ve added a phone number to your Google account, you can use it to recover your password:

Step 1: Visit the Google Account Recovery page.

Step 2: Enter your email address and click ‘Next.’

Step 3: Click on ‘Forgot password?’

Step 4: Click on ‘Try another way’ until you see the option to verify via phone number.

Step 5: You’ll receive a code via SMS. Enter the code.

Step 6: Once verified, you’ll be prompted to enter a new password.

In conclusion, changing or recovering your Google account password is a user-friendly process designed to ensure your account remains secure. Remember to create a strong, unique password and update it regularly to further enhance the security of your account.

What are Xbox Parental Controls in 2023

0

For any parent with a child who loves gaming, maintaining control over what and when they play is crucial. Microsoft’s Xbox consoles provide robust parental controls to help parents achieve just that.

This comprehensive, SEO-optimized guide will explain what Xbox Parental Controls are, how to set time limits, manage these controls, change parental consent, and lay out the rules parents should consider.

Xbox Parental Controls

What are Xbox Parental Controls?

Xbox Parental Controls, also known as Xbox Family Settings, are a set of restrictions and monitoring settings that parents can activate on their children’s Xbox accounts.

These controls allow parents to restrict the type of content their children can access, limit screen time, monitor their online interactions, and much more.

How to Set Xbox Parental Controls and Time Limits

To set up Xbox Parental Controls, you’ll need to create a child account linked to your parent Microsoft account. Here’s a step-by-step guide on setting it up:

  1. Sign in to your Xbox console with your adult Microsoft account.
  2. Navigate to the ‘Settings’ and then ‘Family Settings.’
  3. Select ‘Manage Family Members’ and then ‘Add to Family.’
  4. Follow the prompts to add a child account.

Once the child account is set up, you can set screen time limits by:

  1. Navigating to ‘Family Settings’ again and selecting ‘Screen Time.’
  2. Choose the child account you want to set the limits for.
  3. Toggle on ‘Screen time limits’ and set the desired time for each day of the week.

How to Manage Parental Controls on Xbox

Managing parental controls on Xbox involves changing the settings on your child’s account as per your preferences. Here’s how to do it:

  1. Navigate to ‘Family Settings’ under the ‘Settings’ menu.
  2. Select ‘Manage Family Members,’ then choose the child account.
  3. Here, you can adjust settings such as ‘Content restrictions,’ ‘Web filtering,’ ‘Online privacy and safety,’ and more.

How to Change Parental Consent on Xbox

Parental consent settings determine whether your child can buy items in the Microsoft Store, join multiplayer games, and more. To change these settings:

  1. Sign in to your Microsoft account online and select ‘Family.’
  2. Choose the child account you want to change the consent for.
  3. Adjust the ‘Activity Level’ under ‘Privacy and Online Safety.’

Rules for Parents on Xbox

As a parent, here are some key rules to consider when it comes to your child’s Xbox usage:

  1. Understand the Ratings: Games and apps come with age ratings. Ensure the content your child has access to is suitable for their age.
  2. Set Appropriate Screen Time Limits: Limiting screen time can help balance your child’s gaming and other activities.
  3. Monitor Online Interaction: Enable settings that limit who your child can interact with online.
  4. Regular Check-ins: Regularly review the parental control settings and adjust them as your child grows.

In conclusion

Xbox Parental Controls provide an invaluable tool to keep children safe online. They offer customizable settings to ensure a safe and age-appropriate gaming environment for children, thus giving parents peace of mind while their children enjoy their favorite games.

How To Watch FS1 Free, Amazon Prime, Roku, Hulu, Firestick, And More

0

As a top sports network in the United States, FS1 (Fox Sports 1) has garnered much attention from sports enthusiasts. From MLB to NASCAR, FS1 has a range of sports programs that can keep you glued to your screen.

But, how do you access FS1 if you don’t have a cable connection? Is there a way to watch FS1 for free, on Amazon Prime, Roku, Hulu, Firestick, or YouTube? This detailed guide will answer all your queries.

How To Watch FS1

How to Watch FS1 for Free

Watching FS1 for free can be tricky, as it is a paid network. However, many live TV streaming services offer free trials which include access to FS1. Check out options like Hulu Live TV, FuboTV, or Sling TV and take advantage of their free trials. Remember to cancel the subscription before the trial ends to avoid charges.

How to Watch FS1 on Amazon Prime

While FS1 isn’t directly included with an Amazon Prime subscription, Prime members can add on Fox Sports through Amazon Channels.

Step 1: Go to your Amazon Prime Video application.

Step 2: Navigate to ‘Channels.’

Step 3: Search for ‘Fox Sports’ and click on it.

Step 4: Click on the ‘Subscribe’ button and follow the prompts.

This add-on usually comes with an additional cost and a free trial period.

How to Watch FS1 on Roku for Free

Roku users can watch FS1 through various streaming services like Hulu Live TV, Sling TV, and FuboTV. Many of these platforms offer free trials. Download the desired app from the Roku Channel Store, sign up for a free trial, and start watching FS1.

How to Watch FS1 Without Cable

Several online streaming platforms offer FS1 as part of their package. These include:

  1. FuboTV: Known for its extensive sports coverage, FuboTV includes FS1 in its base package.
  2. Hulu Live TV: Along with access to Hulu’s extensive on-demand library, Hulu Live TV includes FS1 in its channel lineup.
  3. Sling TV: FS1 is included in the Sling Blue package.
  4. YouTube TV: FS1 is part of YouTube TV’s single base package.

All these platforms provide alternative ways to watch FS1 without traditional cable and often come with a free trial.

How to Watch FS1 on Hulu

If you have a Hulu Live TV subscription, watching FS1 is straightforward.

Step 1: Open the Hulu app on your device.

Step 2: Navigate to the ‘Live TV’ tab.

Step 3: Scroll through the channels or use the search function to find FS1.

Step 4: Click on FS1 to start streaming.

How to Watch FS1 on Firestick

To watch FS1 on Firestick, you’ll need a live TV streaming subscription that includes FS1, such as Hulu Live TV, Sling TV, or FuboTV.

Step 1: Navigate to the ‘Search’ option on your Firestick home screen.

Step 2: Type in the name of your preferred streaming service and download the app.

Step 3: Open the app and sign in to your account.

Step 4: Navigate to the live TV section and select FS1 to start streaming.

Can I Watch FS1 on YouTube?

Yes, you can watch FS1 on YouTube through YouTube TV. YouTube TV is a subscription service that includes a variety of channels, including FS1. Once you’re subscribed to YouTube TV, just navigate to the live TV section, find FS1, and start streaming.

How to Watch FS1 Without Subscription

Without a direct subscription to a streaming service, watching FS1 can be challenging. However, most of these platforms offer free trials.

You could rotate between the free trials of FuboTV, Hulu Live TV, Sling TV, and YouTube TV. Just remember to cancel before the trial ends to avoid being charged.

In conclusion

FS1’s extensive sports coverage is available across a range of platforms. Whether you’re a cable-cutter, an Amazon Prime member, or a Roku user, you have numerous options to access FS1 content. So, gear up and enjoy your favorite sports shows on FS1, anytime, anywhere.

How To Make A Kahoot, Creating, Downloading, Playing, And More

0

Kahoot is an innovative learning platform that allows users to create and play learning games or quizzes, known as Kahoots.

This in-depth guide will walk you through creating your own Kahoot, logging in, the significance of game pins, instructions for players, and explore the free and paid features of Kahoot.

How To Make A Kahoot

How To Make A Kahoot

Creating a Kahoot is straightforward and fun. Here are the steps:

  1. Visit the Kahoot website at www.kahoot.com and sign up for a free account if you don’t already have one.
  2. Click the ‘Create’ button at the top of the page.
  3. You’ll be directed to a new screen where you can start building your quiz. You can choose the format (quiz, true/false, puzzle, etc.), input questions, and set the correct answers.
  4. Once you’ve added all your questions, click ‘Done’ to finish creating your Kahoot.

How to Download and Login to Kahoot

Downloading and logging into Kahoot is a simple process:

  1. Download the Kahoot app from the Google Play Store or Apple App Store on your mobile device.
  2. Open the app and click ‘Log In.’
  3. Input your credentials or log in using a Google or Microsoft account.

The Significance of Kahoot Game Pins

A game pin is a unique identifier for each Kahoot session. After a host launches a Kahoot, a game pin is generated. Participants need to enter this pin to join the game. This way, only people present during the session can participate in that particular Kahoot.

Instructions for Players

Playing a Kahoot game is easy and interactive:

  1. Visit www.kahoot.it or open the Kahoot app.
  2. Enter the game pin provided by the host.
  3. Input a nickname.
  4. Wait for the host to start the game.
  5. Answer the questions as they appear on the shared screen. Your device turns into a controller to answer.

How to Create a Kahoot for Free

Creating a Kahoot is free for anyone. After signing up on the Kahoot website, you can immediately start creating your own Kahoot games or quizzes.

While there are premium versions of Kahoot with additional features, the free version provides a wealth of functionalities for users to create engaging quizzes.

How Kids Can Create Their Own Kahoot

Kids can also create their own Kahoots, following the same steps outlined above. However, it’s recommended that they do so under adult supervision to ensure a safe and appropriate learning environment. Kahoot is a fantastic tool for kids to learn and showcase their creativity.

Is Kahoot Free for Anyone?

Kahoot is free for anyone to create or participate in games. It offers a basic free version that allows access to most features.

However, there are also premium plans available that offer additional features such as advanced reports, collaboration tools, and the ability to host games with more participants.

In conclusion

Kahoot is an intuitive and engaging platform that allows users to create and participate in learning games or quizzes. With its free access, anyone can create their own Kahoot and foster a fun, learning atmosphere.

It’s an excellent tool for teachers, students, or anyone who wants to make learning interactive and enjoyable. Always remember to have fun while Kahooting!

How To Cancel Disney Plus Subscription Across Various Platforms

0

Disney Plus is a popular streaming service offering a wide range of entertainment from Disney, Pixar, Marvel, Star Wars, and National Geographic. However, there may come a time when you need to cancel your Disney Plus subscription.

This comprehensive guide will take you through how to cancel your Disney Plus subscription across various platforms, potential problems and solutions, and answer some frequently asked questions about cancellation.

How To Cancel Disney Plus Subscription

How to Cancel Your Disney Plus Subscription

Cancelling your Disney Plus subscription is typically straightforward:

  1. Go to www.disneyplus.com and log in to your account.
  2. Click on your ‘Profile’ in the top right corner.
  3. Click on ‘Account.’
  4. Click on ‘Billing Details.’
  5. Click ‘Cancel Subscription,’ and then ‘Complete Cancellation’ to confirm.

How to Cancel Disney Plus on TV

Most Smart TVs don’t support direct subscription management. Instead, you’ll need to cancel your Disney Plus subscription using the platform through which you subscribed or directly through the Disney Plus website as outlined above.

How to Cancel Disney Plus on Amazon

If you’ve subscribed to Disney Plus through Amazon, you’ll need to cancel it there:

  1. Go to www.amazon.com/appstoresubscriptions.
  2. Sign in to your Amazon account.
  3. Find your Disney Plus subscription and click ‘Actions.’
  4. Click ‘Cancel Subscription’ and follow the prompts to confirm.

How to Cancel Disney Plus on Google Play

For subscriptions made via Google Play:

  1. Open the Google Play Store on your device.
  2. Tap the ‘Menu’ icon and select ‘Subscriptions.’
  3. Find and tap on your Disney Plus subscription.
  4. Tap ‘Cancel Subscription’ and follow the prompts to confirm.

How to Get a Refund on Your Disney Plus Subscription

As per Disney Plus terms of service, they generally don’t offer refunds for cancellations. However, some exceptions may apply, so it’s worth reaching out to Disney Plus Customer Service to discuss your situation.

Can I Cancel Disney Plus Immediately After Subscribing?

Yes, you can cancel your Disney Plus subscription immediately after subscribing. However, your access to the service will continue until the end of your current billing period.

Troubleshooting: Why Can’t I Cancel My Disney Plus Account?

If you’re unable to cancel your Disney Plus account, there may be a few causes:

  1. You’re trying to cancel on a platform that doesn’t support subscription management. Ensure you’re cancelling through the platform where you initially subscribed or directly on the Disney Plus website.
  2. There’s a temporary technical issue. Try again after some time or contact Disney Plus Customer Service for help.
  3. The cancellation process isn’t fully completed. Make sure you’ve clicked ‘Complete Cancellation’ at the end of the process.

In conclusion

Cancelling your Disney Plus subscription is a simple process that can be done on the Disney Plus website or the platform where you initially subscribed. While refunds are generally not provided, there may be exceptions in certain cases.

Should you encounter any difficulties during cancellation, ensure you’re using the correct platform and check for any technical issues.

If the problem persists, Disney Plus Customer Service is available to assist you. Always keep track of your subscriptions and manage them according to your viewing needs.

How To Change Username on Reddit Using With Different Devices

0

Reddit, popularly known as “the front page of the internet,” is a platform where content is king. However, your Reddit username can also play an essential role in how you interact within this online community.

This guide will delve into how to change your username on Reddit using different devices, address the question of username change, and explore possibilities related to hiding your Reddit username.

How To Change Username on Reddit

How to Change Reddit Username

As of my knowledge cutoff in September 2021, Reddit does not allow you to change your username once you have created an account. This is different from your display name, which you can alter.

Your username is what people see in your profile URL and is permanent. If you are not satisfied with your current username, your only option is to create a new account.

Changing Reddit Username on iPhone and Android

Given the same restriction applies across all platforms, you cannot change your Reddit username on iPhone or Android directly. If you wish to use a different username, you will need to log out of your current account and create a new one.

Remember, Reddit does not prohibit having multiple accounts, so you can have a different account for different purposes or communities if you choose.

Will You Ever Be Able to Change Your Reddit Username?

As per the latest information available, Reddit has not announced any plans to allow users to change their usernames.

This might be due to maintaining the integrity of interactions and preventing confusion in comment threads and message histories. However, Reddit often rolls out updates and new features, so this could change in the future.

Can I Hide My Reddit Username?

While you cannot hide your Reddit username per se, there are ways to maintain your privacy. You can use a pseudonym as your username that doesn’t link to your real-life identity. Also, avoid sharing personal information in your posts and comments.

If you need a higher level of anonymity for certain activities on Reddit, consider creating a throwaway account. This is a secondary account that users create for specific purposes, such as discussing sensitive topics.

In conclusion

Your Reddit username is a fixed aspect of your account, and as such, careful consideration should be given when choosing it. If you’re seeking to explore new facets of your Reddit presence, creating a new account is currently the best way to do so.

Remember, the power of Reddit lies in the content and the communities you participate in, and not just in the username you hold.

How Do You Block Someone on Snapchat, Steps, Implications, and Stealth Tactics

0

Snapchat is a popular social media platform with millions of active users worldwide. While it’s great for staying connected, there may come a time when you need to block someone.

This comprehensive guide will show you how to do so, explain what the blocked person will see, and address whether or not they will know about it.

How Do You Block Someone on Snapchat

How to Block Someone on Snapchat

If you’ve decided to block a user on Snapchat, you can follow these simple steps:

Step 1: Open your Snapchat app and go to your chat screen.

Step 2: Swipe right to locate the person you wish to block.

Step 3: Tap and hold their name to bring up a menu.

Step 4: Select ‘More’ from the pop-up menu.

Step 5: Tap on ‘Block’ in the drop-down list.

Snapchat will ask for confirmation. Once you confirm, the user is blocked. They will not be able to send you snaps or view your story, and they will be removed from your friends list.

What Does the Blocked Person See?

When you block someone on Snapchat, they won’t receive any notification about it. However, they won’t be able to view your Story or Charms.

If they try to snap you, it won’t go through. If they attempt to search for your username, it won’t appear. All these signals might lead them to suspect that they’ve been blocked.

Can You Block Someone on Snapchat Without Them Knowing?

As mentioned before, Snapchat doesn’t send a notification when you block someone. But, if the person tries to interact with you, they might notice some changes. Here are some ways you can make it less noticeable:

  1. Remove them as a friend first: If you’re friends on Snapchat and suddenly block them, they might notice your absence from their friends list. Instead, remove them as a friend first. They won’t receive a notification about this. After a while, you can proceed to block them.
  2. Adjust your privacy settings: Another tactic is to adjust your privacy settings to limit their access to your posts. Under ‘Who Can…’, you can adjust ‘Contact Me,’ ‘View My Story,’ and ‘See My Location’ to ‘My Friends,’ excluding the person you want to block without actually blocking them.
  3. Block and unblock them: If you block and then unblock someone, they will no longer be on your friends list. They won’t be able to send you snaps, but they will be able to see your public posts.

In conclusion

Snapchat offers several features to help you manage who can interact with you on the platform. Blocking someone on Snapchat is straightforward, and while the blocked person won’t receive a notification, savvy users may deduce it based on changes in their ability to interact with you. With the right steps, you can make the process less noticeable.

How To Turn Off Flash Notification on Various Devices

0

Flash notifications are a helpful feature designed to alert users of incoming calls, messages, or notifications by flashing the phone’s camera light.

While useful for some, others might find it disruptive. This guide will show you how to turn off flash notifications on various devices, including iPhones, Android devices, tablets, and specific models like Samsung.

How To Turn Off Flash Notification

How to Turn Off Flash Notifications on iPhone

If you’re an iPhone user and want to turn off flash notifications, follow these steps:

  1. Open ‘Settings.’
  2. Scroll down and tap on ‘Accessibility.’
  3. Under the ‘Hearing’ section, tap on ‘Audio/Visual.’
  4. Toggle off ‘LED Flash for Alerts.’

The same procedure can be used to turn off flash notifications for texts on iPhone.

How to Turn Off Flash Notifications on Android

Android users can also disable flash notifications easily. Here’s how:

  1. Open ‘Settings.’
  2. Scroll down and tap on ‘Accessibility.’
  3. Look for ‘Flash Notification’ or ‘Flash alerts’ and tap on it.
  4. Toggle off the switch for ‘Camera Light’ or ‘Screen.’

Note: The exact wording might vary depending on the Android version and device manufacturer.

How to Turn Off Flash Notifications on Tablets

The process of disabling flash notifications on tablets, whether they are iPads or Android-based, follows the same steps as with phones.

  • For iPad, navigate through: Settings > Accessibility > Audio/Visual > LED Flash for Alerts.
  • For Android tablets, the route is: Settings > Accessibility > Flash Notification or Flash alerts.

How to Turn Off Flash Notification on Samsung

Samsung devices, being Android-based, generally follow the same path, but with some minor differences:

  1. Open ‘Settings.’
  2. Tap on ‘Accessibility.’
  3. Tap on ‘Advanced settings.’
  4. Tap on ‘Flash Notification.’
  5. Toggle off the switch for ‘Camera Light’ or ‘Screen.’

If you’re looking to disable flash notifications specifically for texts, follow the same steps above. The notifications are generally applied to all alerts on the device, not just calls or specific applications.

In conclusion

While flash notifications can be a helpful feature for some, they might be a source of annoyance for others.

Fortunately, whether you’re using an iPhone, an Android device, or a Samsung model, turning off flash notifications is a simple process that can be done within a minute or so.

Remember, customizing your device’s settings can help you create a more personalized and enjoyable user experience.

How To Add Roblox Gift Card on Various Devices, and More

0

Roblox is a popular online gaming platform and game creation system that allows users to design their games and play a wide variety of different types of games created by other users.

One of the ways to unlock premium content in this virtual universe is by using Roblox gift cards. This comprehensive guide will walk you through how to add a Roblox gift card, redeem codes on various devices, and shed some light on Roblox’s in-game currency.

How To Add Roblox Gift Card

How to Add a Roblox Gift Card

Roblox gift cards can be a great way to load up on Robux or to get a Premium subscription. Here’s how you can add a Roblox gift card to your account:

  1. Purchase a Roblox gift card online or from a physical store.
  2. Visit the Roblox gift card redemption page on your browser.
  3. Log in to your Roblox account.
  4. Enter the PIN from the gift card in the ‘Enter PIN’ section and click ‘Redeem.’
  5. After confirming your Roblox username, the value of the card will be automatically added to your account.

How to Add Roblox Gift Card on iPad and Mobile

Redeeming a Roblox gift card on an iPad, iPhone, or Android device is similar to the process on a computer:

  1. Open a web browser on your iPad or mobile device.
  2. Visit the Roblox gift card redemption page.
  3. Log in to your Roblox account.
  4. Enter the PIN from the gift card and click ‘Redeem.’
  5. After confirming your username, the gift card amount will be added to your account.

How to Redeem Roblox Codes

Roblox codes, also known as promotional codes, can be redeemed to get exclusive items in the game:

  1. Visit the Roblox promo code redemption page.
  2. Log in to your Roblox account.
  3. Enter your code in the ‘Enter Your Code’ section and click ‘Redeem.’
  4. If the code is valid, you’ll see a green thumbs up and an appropriate message indicating the item you’ve received.

How to Add a Roblox Gift Card on a Tablet

Adding a Roblox gift card on a tablet is no different than on a mobile device or a computer:

  1. Open a web browser on your tablet.
  2. Visit the Roblox gift card redemption page.
  3. Log in to your Roblox account.
  4. Enter the PIN from the gift card and click ‘Redeem.’
  5. The gift card amount will be automatically added to your account after confirming your username.

Understanding Roblox Currency: How Much is $10 in Roblox?

The in-game currency for Roblox is Robux. When you use a $10 Roblox gift card, it will add 800 Robux to your Roblox account. The actual amount of Robux you can get might vary slightly depending on current offers, deals, or bonuses provided by Roblox.

In conclusion

Whether you’re playing on a computer, mobile device, or tablet, adding a Roblox gift card to your account and redeeming promotional codes is a straightforward process.

Gift cards can be an excellent way to acquire more Robux, upgrade to a Premium membership, or unlock unique items to enhance your gaming experience. And remember, in the world of Roblox, creativity and imagination reign supreme!

How To Reboot Firestick With and Without a Remote

0

Amazon’s Firestick is a popular tool for streaming a wide variety of content right on your TV. But like any device, it can occasionally encounter hiccups in its operation that may necessitate a reboot.

In this comprehensive, SEO-optimized article, we’ll discuss how to reboot your Firestick, with or without a remote, how to reset it to factory settings, and answer some commonly asked questions about Firestick maintenance.

How To Reboot Firestick

How To Reboot Firestick With a Remote

  1. Press and hold the “Select” and “Play/Pause” buttons on your Firestick remote simultaneously.
  2. Continue to hold these buttons down for about five seconds.
  3. The Firestick should automatically start to reboot.

How To Reboot Firestick Without a Remote

In case you’ve misplaced your remote or it’s not working, here’s how to reboot your Firestick:

  1. Download and install the Amazon Fire TV app on your smartphone (available on Android and iOS).
  2. Open the app and sign in with your Amazon account.
  3. Your Firestick should appear in the list of available devices. Tap on it to connect.
  4. Once connected, you will see a remote interface on your phone’s screen. Here, you can follow the steps above to reboot your Firestick using the on-screen remote.

How to Factory Reset Your Firestick

If rebooting doesn’t solve the issues you’re experiencing, you may need to reset your Firestick to its factory settings:

  1. From your Firestick’s home screen, navigate to “Settings.”
  2. Scroll to the right and select “My Fire TV.”
  3. Scroll down and select “Reset to Factory Defaults.”
  4. You’ll be asked for confirmation since this process will delete all your personal data and downloaded apps. If you’re sure, select “Reset.”

Please note, a factory reset should be a last resort, as you’ll lose all your personal data and settings.

Do Firesticks Need to be Rebooted?

Like any device, Firesticks can benefit from periodic reboots. This can help to clear out temporary files and free up system resources, improving the device’s performance. Rebooting can also solve minor glitches, such as a slow or non-responsive Firestick.

What Buttons to Hold to Restart Firestick?

To restart your Firestick using the remote, press and hold the “Select” and “Play/Pause” buttons simultaneously for about five seconds. This will prompt your Firestick to reboot.

In summary, while the Firestick is generally a user-friendly device, knowing how to reboot or reset it can come in handy in the event of technical issues.

With these tips, you’ll be well-equipped to keep your Firestick running smoothly and continue enjoying your favorite content. Happy streaming!