Home Blog Page 37

Digital TV Tuner Device Registration Application Issue {Fixed}

0

Sometimes, you may notice that your computer has become excessively slow while watching a cable channel on your computer. So far so that it is impossible to use it. It could be caused by a number of programs that you might come across while performing a scan using your antivirus software. One of these programs would be the Digital TV Tuner Device Registration Application.

What Is A Digital TV Tuner Device Registration Application?

A digital TV tuner allows your digital TV to receive digital TV signals broadcasted on your local TV stations. The Digital TV tuner device registration application is a scheduled task that is part of the Windows Media Center. It is a simple feature available on your PC that allows you to watch all the cable TV channels straight away from your local cable TV provider on your PC.

In most cases, the Digital TV Tuner Device Registration Application gets installed on your PC with other freeware. The primary process of the Digital TV Tuner Device Registration is ehPrivJob.exe, which is a non-system process. It is used to explore digital cable tuners that might be attached to your PC. The ‘eh’ abbreviation comes from eHome, and it belongs to the digital TV tuner device registration application.

Speaking strictly from a security point of view, there are no issues with the Digital TV Tuner Device Registration Application or the process behind it. But from a performance viewpoint, it certainly slows down your PC to a considerable amount when you are actively using the TV tuning feature. However, it mostly affects the boot-up times, and not the system performance once the startup sequence is complete.

Causes of The Digital TV Tuner Device Registration Application Issues

Since most of the installed programs will store data on your system and its registry, it may lead to fragmentation. It results in creating invalid entries. This ultimately slows down the performance of your PC.

The process behind the Digital TV Tuner Device Registration Application, ehPrivJob.exe, is a running program that contains machine code. Running Windows Media Center on your PC also executes the said process. Therefore, it is loaded into your PC’s RAM and runs as a Windows Media Center process.

Although it isn’t CPU intensive, it can affect the performance of your PC, especially when you’re running too many processes at the same time. To reduce such overload, you can disable those processes which launch themselves automatically upon startup.

5 Fixes For The Digital TV Tuner Device Registration Application Issues

Method 1: Uninstalling the TV Tuner

In this last method, you need to uninstall the TV tuner application to solve your issue. For doing so, follow the following steps:

Step 1: First of all, open the Control Panel on your PC. For this, you can either use the keyboard shortcut or click on the Start button and then search for Control Panel option.

Step 2: Here, you need to select the Programs and Features option from the list of options.

Step 3: Now click on the Uninstall a Program Option.

Step 4: Here, find the TV tuner and select the same.

Step 5: Click on the Uninstall button to uninstall the same.

Step 6: Wait for the un-installation process to complete and then Restart your PC.

Also Read:

Method 2: Use the Resource Manager and End the Process

One of the ways to fix the Digital TV Tuner Device Registration Application error is to end the process, which causes the issue in the first place. The following steps can help you do just that:-

Step 1: You need to open up the Task Manager on your PC. To do so, you can either right-click on the taskbar and select Open Task Manager option or simply press the Ctrl + Alt + Del keys together on your keyboard.

Step 2: Now, select the Performance tab and then, from there, open the Resource Monitor in the window.

Step 3: Here, under the Processes tab, you need to find the ehPrivJob.exe process. Then click on the End task button.

Step 4: Then, click on the OK button to close the Task Manager window.

Step 5: Now, simply restart your PC to allow the new settings to take effect.

Method 3: Turn the Windows Features off Using Control Panel

Step 1: Open the Control Panel on your PC. For this, you can either use the keyboard shortcut or click on the Start button and then search for Control Panel option.

Step 2: Here, you need to select the Programs and Features option from the list of options.

Step 3: Now, turn off the toggle off for Turn Windows Feature.

Step 4: Then select the Media Features and expand the options by clicking the expand icon.

Step 5: Here, find the Windows Media Center option and uncheck the same.

Step 6: Click on the OK button to close the window and restart your PC so the new settings can take effect.

Method 4: Disable any Scheduled Tasks

A task with the name ehdrminit is one of the major causes of this issue. Hence, disabling this scheduled task may help to fix the Digital TV Tuner Device Registration Application issue. You can follow these simple steps to do that:

Step 1: First of all, you need to open the Start menu. To do that, you can either use the keyboard shortcut or click on the Start button and search for the Task Scheduler option.

Step 2: Here, you need to click on the Library Option.

Step 3: Now, open the Microsoft Folder.

Step 4: From here, open the Windows folder now and disable the ehdrminit task.

Step 5: Now Close All the open folders on your PC.

Step 6: Finally, Restart your PC to allow the changes to take effect.

Method 5: Delete the DRM Folder

Digital Rights Management or DRM is a term that refers to any scheme that controls access to copyrighted material using technological means. It removes usage control from the person in possession of digital content and puts it in the hands of a computer program. You can try the following steps to delete the DRM folder on your PC to solve your problem:

Step 1: First and foremost, you need to open the File Explorer or My Computer on your Windows PC.

Step 2: Now, select the Programs option and then click on the Data folder.

Step 3: Open the Microsoft folder and then select the Windows option.

Step 4: Here, select the DRM folder and delete the same.

Step 5: Once that is done, Restart your PC.

You may also like:

Conclusion

Thus, you can follow the methods described above until you find the one best suited for you to solve the Digital TV Tuner Device Registration Application issue on your PC.
Error 0x80300024 While Installing Windows {Fixed}

0

Users can face various types of errors while using a computer device. There are multiple streams of malfunctions that can arise in the Windows Operating System. 0x80300024 errors can turn out to be extremely irritating and can hamper smooth functioning while conducting essential tasks on the computer.

Error 0x80300024 While Installing A New Operating System

In spite of diligent design, the Windows Operating System is not fully exempt from external flaws. It can be because numerous features are present at one place in the same device. One such annoying error that users can witness is while trying to install a different version of the Operating System.

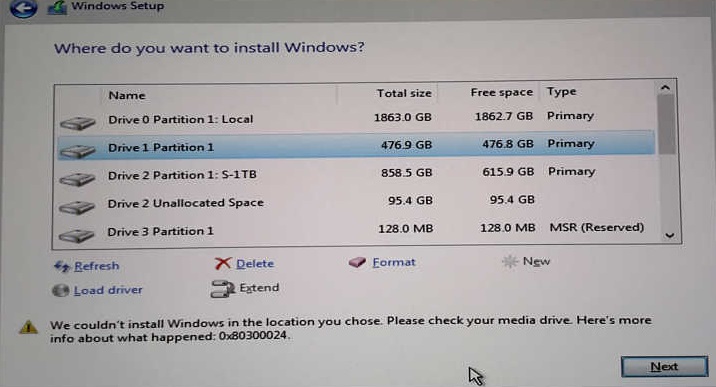
The error message pops-up “Windows is unable to install at the selected location” in-between the installation process. The computer creates an automatic error code along with it. The error code for this problem is ‘0x80300024’ which also pops-up at the bottom of the screen.

It points us towards acknowledging the exact fault of the Error 0x80300024 – which is some software or hardware related malfunction. More specifically, probable causes can be spoiled installation media or overloading of default destination drive or the hard is damaged or corrupted. In other words, this happens when the Windows installer cannot carry on further with the installation process.

Read Also:

  1. Printer Driver Is Unavailable
  2. Reboot And Select Proper Boot Device

5 Ways to Fix Error 0x80300024 While Installing A New Windows

There are various reasons for 0x80300024 error to arise, and Windows 7 and Windows 10 users are most likely to witness it. Fortunately, every error comes with secure solutions. The user can rectify the 0x80300024 error by performing specific troubleshooting solutions and then the user can re-install the concerned Windows version successfully. Let us go over specific solutions to resolve the Error Code: 0x80300024.

Method 1: Disengage All The unnecessary Hard drives

In case the computer possesses more than one hard drive than the error is likely to arise. While installing the different versions of the operating system in one of the hard drives, other drives might create some interference. A simple resolution is to detach all the external hard drives except the one where the installation process is taking place. It stops any interference arising out of the other drives. Try this and check if the problem resolves or not.

Also Read:

Method 2: Plug The Installation Media Into Some Other USB Port

This solution applies only if you are trying to install the operating system using a USB flash drive. The port where you plugged the installation device might be industrious, causing the error 0x80300024. Specific ports are not susceptible to a particular USB drive. It is because the USB drive requires the transfer of files at different rates to conduct the installation process smoothly.

USB 2.0 offers a speed of 480 Mbps while transferring files and USB 3.0 transfers at a speed of 4.8 Gbps. Try changing the USB port from 2.0 to 3.0 and vice versa and check if the error persists or not.

Method 3: Confirm That The Target Drive Is Located At The Top Of The Device’s Boot Sequence

There is one pre-requisite to install a different operating system. You need to set the installation drive at the apex position of the device’s boot order. The boot order is something that specifies the computer to perform a specific type of function chronologically as required.

All the operating systems incorporate specific tasks in it which assist the computer in performing them in an innate chronological manner. The administrator can alter such a boot system manually. The user can configure it at the most rudimentary level through the device’s Basic Input / Output System (BIOS).

Specifically, the error arises when the destination drive is not present at the top of the boot sequence. Simply, execute the following steps to resolve the error.

Step 1: To begin with, turn on your computer.

Step 2: Now, you need to go to the BIOS mode to check the position of the target drive. To do this, the moment when the computer boots up, instruction to press a certain key to launch BIOS will be visible on the screen. In most cases, the key is Del, F1 or F2 – pressing which the computer enters into the BIOS mode.

Step 3: Then, the BIOS setup utility window will pop-up on the screen. Now, in the BIOS, you need to navigate to the computer’s boot sequence. Customarily, it is situated in the ‘Boot’ tab.

Step 4: Then, you will need to adjust the boot sequence. Place the hard drive where you are trying to install the new operating system on the top of the boot sequence.

Step 5: Do not forget to press ‘F10’ on your keyboard to save and exit the computer’s BIOS. That’s it you are good to go.

After this, restart the computer and try reinstalling the operating system and check if the Error Code: 0x80300024 persists or not.

Read Also:

  1. 0x800705b4
  2. Mac Microphone Not Working

Method 4: Clear The Installation Location

The destination drive where you are going to install the new operating system files should not contain any other data in it. If there is any data in that concerned drive, it could, in some ways, affect the installation process and eventually the error 0x80300024 pops-up. The windows installer is very particular and simply would not install the new operating system files considering the folder as damaged or corrupt.

So the destination folder should always steer clear of any other files or data. So, if this is the cause of the problem, removing all the files from the hard drive should resolve it. Execute the following steps for the same.

Step 1: To begin with the installation process and complete it smoothly, you need to have Windows Installation Media present on your computer. If the media does not exist, you need to form one and then install the new Operating system.

Step 2: Now, with the Windows Installation Media present in your computer, boot up your device using the same.

Step 3: Then, simply follow the on-screen prompts and select your preferences.

Step 4: After that, the computer will ask you about the type of installation you want. Select ‘Custom (advanced)’ when it pops-up.

Step 5: Now, the computer will ask to set up the location of the new Operating system needs. Select the option Drive options (advanced).

Step 6: Before going forward with the installation process, you need to format the installation hard drive. To do this, select the hard drive where you want to install the Operating system and choose ‘Format’.

Step 7: Wait until the drive gets formatted and then click on ‘Next’.

Hopefully, after doing this, the further process will perpetuate without any 0x80300024 Error.

Method 5: Substitute Your Hard Drive

In case, if none of the above-described solutions works, then the ultimate and only solution remaining is to substitute your computer’s hard drive. The hard drive might be corrupt or dead, and you need to replace it with a new one. If this is the case, then the only solution remaining is to insert a new hard drive into the system and then install the latest Operating system. This will undoubtedly resolve the error, and you will be able to install the Operating system.

You may also like:

Conclusion

Nowadays, it has become quite simple to change the Operating System version of your device. But, it can get annoying if you are not able to install it on your computer after buying it. Hopefully, the above solutions have helped change the version of the computer’s operating system.

No Audio Output Device is Installed Error {Fixed}

0

Sound feature in any Windows Operating System works only in the presence of an audio device in your PC, without which your PC will be mute, and you will not be able to hear any sound. Many users encounter the No Audio Output Device is Installed error, due to which the audio feature of your PC completely stops working.

No Audio Output Device is Installed can occur because there is no audio device on your PC, or it is corrupt somehow. It can also happen when the installed audio device is not compatible with the Windows version on your PC, and thus the Windows Operating System cannot recognize it.

No Audio Output Device is Installed Error

When No Audio Output Device is Installed, the error is an encounter, the Windows sound icon on the taskbar also displays a red cross mark. Although the No Audio Output Device is Installed error can occur on any version of Windows, it is mostly found upon updating the OS to Windows 10.

Read Also:

  1. WLDCore.dll
  2. Digital TV Tuner Device Registration Application

11 Ways to Fix No Audio Output Device is Installed Error

No sound on your PC is a significant source of the problem, and so fixing it is of extreme importance. You cannot wait for new updates to fix the problem automatically as that is time-consuming, therefore here are some methods you can try to fix the No Audio Output Device is Installed error manually.

Method 1: Use Microsoft System Restore Feature

The Microsoft system restores feature is a Windows feature that helps to fix various types of crashes and other problems related to your PC. If a certain problem occurs on your PC in relation to bad software or app installation or something else which is hard to fix, then the System restores feature helps to return the Windows installation to its last working state since before the problem arose. Enabling System Restore may help solve the issue by restoring the PC to a time when the No Audio Output Device is Installed error had occurred. It can be enabled following these simple steps:

Step 1: At first, go to the “Start” option.

Step 2: Then, type “restore” in the search box.

Step 3: Now, click on “create a restore point.” It will open the dialogue where you can get all the System Restore options.

Step 4: Here, under “protection settings,” you will find the drives on your PC and whether protection is enabled for each one or not. To turn on protection, click on the respective drive, and select “configuration.”

Step 5: Next, click on the “turn on system protection” option and adjust the “max usage” to the amount of hard drive space you want system restore to be able to use.

Step 6 – Then, click on, OK.

Note: For restore point created by Windows, System Restore creates a restore point on all the drives that have system protection enabled.

Also Read:

Method 2: Reinstall The Device Driver

In this method, the No Audio Output Device is Installed error can be easily solved by first removing the corrupted audio driver on your PC and then reinstalling it from the Microsoft website. It can be done in the following ways:

Step 1: At first, go to the Start menu and type “Device Manager” in the search box.

Step 2: Next, click on the “Sound, video, and game controllers” option.

Step 3: Now, right-click on the installed device driver there and then click on “Uninstall.”

Step 4: Restart your PC and then open the Windows Device Manager again in the same way.

Step 5: Now, right-click on the white part of the page and click on the “Scan for hardware changes” option. It will help you detect if any audio drivers are available.

Step 6: If any audio driver is available, right-click on it and then click on “install.” In case there isn’t, download an audio driver from the official Microsoft website and install it.

Method 3: Re-enable The Audio Device

Re-enabling the audio device on your PC can help eradicate the No Audio Output Device is Install error. To do so, follow these steps accordingly:

Step 1: At first, go to the Start menu and type “Device Manager” in the search box.

Step 2: Next, click on the “Sound, video, and game controllers” option.

Step 3: Now right-click on it and then click on the “enable” option to enable it again.

Method 4: Use Scannow To Fix The Driver

The sfc scannow option is one of the ways by which command prompt command is used to run System File Checker. It searches for, finds, and solves any issues with system files. You can run it using the following steps:

Step 1: At first, open the “Start” menu and type “cmd.”

Step 2: Then, right-click on the cmd option that appears, and select “Run as administrator” from the menu that follows.

Step 3: Once Command Prompt is open, type the following command “sfc/command,” and then press Enter.

Step 4: If the sfc/scannow repairs some files, then restart your PC.

Method 5: Update Outdated Audio Device Drivers

You can check if the No Audio Output Device is Installed error is being caused by outdated audio device drivers and then solve it. It can be done by following these simple steps:

Step 1: First and foremost, download and install Driver Easy your PC. It is a tool that automatically scans your system’s driver needs and searches for suitable drivers for your system.

Step 2: After that, open Driver Easy and click on the “Scan Now” option. It will detect the presence of wrong drivers, if any, on your PC.

Step 3: After the scan is done, click on the “download” option that appears to download the latest updated driver found.

Method 6: Change Your Sound Card

Faulty hardware can result in damage to your PC’s sound card. It could thus result in the No Audio Output Device is Install error. To solve this, you need to consult a professional who will change your system’s sound card, as, without proper knowledge of hardware, it will not be possible to do on your own.

Method 7: Repair Your Windows Corrupted Registry Database

The Windows Registry Database is a hierarchical structure that contains information about a program’s version, its location, and settings on how to start the program. Every time a program is installed, a new sub-key is added to the registry containing the following information.

The Windows Registry Database could be corrupted due to the presence of some virus or malware on your PC, which can generate issues like the No Audio Output Device is Installed error. You can opt for third-party tools available in the market to remove your registry issues. To do so, follow these steps:

Step 1: First and foremost, download and install the Regsofts Free Registry Repair tool on your PC.

Step 2: Next, click on “start scan” to scan for registry error issues.

Step 3: After the scan is done, click on “Fix Errors” to fix all the registry errors.

Read Also:

  1. Steam Missing File Privileges
  2. IDT High Definition Audio CODEC

Method 8: Add A New Audio Device

The No Audio Output Device is Installed error can also arise from having no audio device installed on your PC. To check that, follow these:

Step 1: At first, go to the Start menu and type “Device Manager” in the search box.

Step 2: Next, click on the “Sound, video, and game controllers” option.

Step 3: Click on it to maximize it and check if any audio device is present.

In case there is no audio device there, follow the next few steps to add new audio device:

Step 1: Go to start menu and open “Device Manager“.

Step 2: Next, click on “Action” and then “Add Legacy hardware” option.

Step 3: After this, click on “Next,” select “Search automatically for updated driver software” option and then again click on “Next.”

Step 4: If no audio device is found, then the wizard will help you to select an audio device suitable for your needs, and you can add that.

Step 5: Again, select the “Sound, video, and game controllers” option and then click on “Next.”

Step 6: Finally, select the audio device just added and click on “Next” to end the process.

Method 9: Use The Audio Troubleshooter

The Audio Troubleshooter is a unique feature of the Windows that automatically detects issues related to audio and sound devices and fixes them. It can be used to fix the No Audio Output Device is Install error in the following manner:

Step 1: First, click on the sound icon at the bottom right corner of the screen. From the menu that appears, click on “Troubleshoot sound problems” option.

Step 2: The audio troubleshooter will automatically scan for audio problems on your PC.

Step 3: After the scan is complete, it will display the result, along with the changes it made to your system for solving the problems.

Step 4: Finally, check if the audio or sound error persists.

Method 10: Have A Look At Windows Audio Services

In case Windows is unable to play any audio devices, the No Audio Output Device is Install error can occur. To make sure that is not the case, you need to check the sound system of your PC following these simple steps:

Step 1: First, go to the “Search” menu and type “services.”

Step 2: Right-click on it as it appears and then select the “Run as administrator” option.

Step 3: As the services, a window appears to check for these two options – Windows Audio and Windows Audio Endpoint Builder. Make sure that both are in running mode and set to work automatically.

Method 11: Reboot Your PC

Sometimes, the No Audio Output Device is Install Error can also occur due to change in hardware configuration at the time Windows is loading. To avoid this issue, try not to remove any part of your PC, including mouse, keyboard, etc. while Windows is booting. In case the error takes place due to this inconvenience, reboot your PC once, and your problem will be fixed.

You may also like:

Conclusion

So these 11 methods to fix the No Audio Output Device is Install Error on PC. Try the step by step and accordingly. Hopefully, your problem will be resolved.

WLDCore.dll is Missing Error on Windows {Fixed}

0

DLL stands for Dynamic Link Library. There is a DLL file that is associated with Windows Live Client, known as WLDCore.dll. Such kind of files allows multiple software programs to share the same functionality.

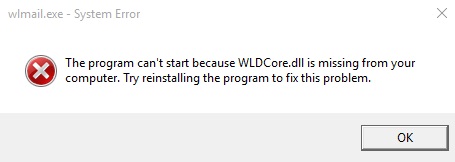
Well, just like any other file, this can also have some bugs. One of the common errors associated with it is “wldcore.dll is not found” error. It implies that the Windows failed to load wldcore.dll files correctly. Moreover, this WLDCore.dll is Missing Error can occur during PC startup, program startup, or trying to use a specific function.

WLDCore.dll-is-Missing-Error

How to Fix WLDCore.dll is Missing Error

There are a few methods that you can use to fix this wldcore.dll is not found. Some of them are mentioned below for your reference.

Method 1 – Manually Register Wldcore.dll Using Microsoft Register Server

Generally, weldcore.dll will be installed automatically by the software that needs it. But in some situations, if that does not happen, then you can just install it manually. Follow the below-given steps for the installation.

Step 1: Firstly, click on the start button and then type ‘command’ in the search box.

Step 2: Next, hold Ctrl + Shift and then press Enter.

Step 3: After you perform the above two steps, a permission dialog box will appear, and you have to click on Yes.

Step 4: Now, type the following command in the window: regsvr32 /u wldcore.dll

This command will unregister the file.

Step 5: After that, type the next command and then press Enter: regsvr32 /i wldcore.dll 

It will register the file.

Step 6: Finally, close the command prompt and try to open the program that requires wldcore.dll.

You may also like:

Method 2 – Repair Invalid Wldcore.dll Registry Entries

Whenever you uninstall any program, there is a possibility that some of the invalid wldcore.dll registries might be left behind.

Along with that, malware infection can also occur. The solution to this is to repair the Windows registry manually. It is advised to create a backup before you do it. To know how to create a backup, you can follow the steps given below.

Step 1: Firstly, click on the start button and then type ‘command’ in the search box.

Step 2: Next, hold Ctrl + Shift and then press Enter.

Step 3: After you perform the above two steps, a permission dialog box will appear, and you have to click on Yes.

Step 4: Now, in the space provided, type regedit, and then hit Enter.

Step 5: Afterwards, from the registry editor, select wldcore.dll related key. For example, you can choose the Windows Live Client.

Step 6: Next, choose Export from the file menu.

Step 7: Select the folder from the Save In the list for where you wish to save the file.

Step 8: Now, find a name for the file.

Step 9: Make sure that the Selected Branch has been checked in the Export Range box.

Step 10: Lastly, click on Save.

By following the above steps, you will be able to create a backup with the .reg file extension. Now you can proceed to repair the registry manually.

Method 3 – Remove Or Restore Wldcore.dll From Windows Recycle Bin

If the methods mentioned above do not work for you, then you can try this method. As there can be a possibility that you might have accidently deleted the file and therefore, you should check for it in the recycle bin.

Step 1: Firstly, double-click on the Recycle Bin icon.

Step 2: Afterwards, recycle bin opens, search for the wldcore.dll file.

Step 3: If you find the file in the recycle bin, then move it to the following directory: C:\Windows\System32\

Step 4: At last, you need to restart your computer system to implement the steps.

After your computer system restarts, check if the WLDCore.dll is Missing Error in Windows 10 still persists or not.

Method 4 – Update Your PC Device Drivers

If the methods mentioned above do not work for you, then there is no need to stress out. There might be some other reason that could be causing the WLDCore.dll is Missing Error in Windows 10.

There might be a possibility related to the device drivers. Sometimes this error is caused because the device drivers are not updated. Therefore, it is always required to keep your drivers updated. So, to make sure that this is the reason for the error, you need to check if your system’s drivers are updated or not. You can follow the below-given steps for that.

Step 1: At first, you need to right-click on the My Computer icon.

Step 2: Now, from the drop-down menu that appears, select Properties.

Step 3: Next, in the newly opened window, click on Device Manager.

Step 4: After this, you will see a list of the devices. From that list, you need to spot the ones with a yellow exclamation mark.

Step 5: Once you spot the drivers with an exclamation mark, right-click on it and click on Update Driver.

It will update the driver.

Step 6: Afterwards, restart your computer system and check if the error persists or not.

Method 5 – Utilize Windows System Restore To Undo Recent System Changes

There is one more method that you can try to get rid of the error. It is a simple method, yet it is undoubtedly beneficial. This method is System Restore. System Restore can help you change things back to normal, or we can say that it can help you return to the instance when everything was working smoothly and correctly. It can save you from the task of troubleshooting the DLL error in your computer system. The steps to perform it are mentioned below.

Step 1: Firstly, click on the start button.

Step 2: Now, in the Search Box type ‘System Restore’ and then hit Enter.

Step 3: Now, from the search results, select System Restore.

Step 4: Note that, if the passwords are prompted for the administrator, then use them.

Step 5: Now, you just need to follow the on-screen instructions to choose a restore point.

Step 6: Restore your system next.

Step 7: Finally, restart your computer system and check for the error.

Method 6 – Uninstall And Reinstall the Windows Live Client Program Associated With Wldcore.dll

Well, in this case, you know that the error persists due to a specific program. So, the best and possibly least time consuming solution will be to uninstall and then reinstall the program. You can follow the steps below to implement this method.

Step 1: Firstly, open the Start Menu.

Step 2: After that, select Programs and Features.

Step 3: Now, in the newly opened window, search the program associated with the wldcore.dll error. For example, select the Windows Live Client Program.

Step 4: Next, click on the program found in the previous step.

Step 5: Now, in the menu ribbon, which you can find at the top, select Uninstall/Change.

Step 6: Next, all you need to do is to proceed with the on-screen instruction.

It will lead you to successful uninstallation.

Step 7: Lastly, you have to install the program again correctly.

It will possibly solve the WLDCore.dll is Missing Error in Windows 10.

Method 7 – Run Windows System File Checker

One other reason leading your computer system towards the WLDCore.dll is Missing Error in Windows 10 can be a corrupt file system. Thus, if that is the reason then, you should run Windows System File Checker to repair the corrupt files in your system. To execute the above-explained method, follow the steps given below.

Step 1: At first, click on the start button.

Step 2: Now, in the Search Box type ‘cmd.’

Step 3: Next, simultaneously press, Ctrl + Shift + Enter and then click OK.

It will open Command Open. Although to open Command Prompt, you can also press Windows Key + X together and then click on Command Prompt (Admin).

Step 4: After that, in the command prompt type, “sfc/scannow.”

Step 5: With the above step, the process to repair the corrupt files will start, but it will take some time.

Step 6: Finally, restart your system and check if the WLDCore.dll is Missing Error in Windows 10 still persists or not.

Method 8 – Install All Available Windows Updates

If any of the above methods do not work for you, then your problem might not be that complicated. There can be a possibility that your computer system might just need a simple Windows Update with the latest Service Pack. To know how to update Windows, just follow the steps.

Step 1: At first, click on the start button.

Step 2: Next, in the search box type ‘update’ and after that hit enter.

Step 3: By doing this, the Windows Update dialogue will appear on your computer screen.

Step 4: After this, you can see through it for any available update.

Step 5: If there are any updates available, then just click on Install Updates.

There is a high possibility that this will solve your WLDCore.dll is Missing Error in Windows 10. But if the error persists, then you can resort to other methods.

Method 9 – Conduct A Full Malware Scan For Your PC

Well, if any of the methods mentioned above do not work for you, then you can try this another method, which is very much likely to solve your WLDCore.dll is Missing Error in Windows 10. One of the prominent reasons for the occurrence of this error could be a malware infection. The malware infection can cause huge damage to your WLDCore.dll file, and thus, it needs to be checked and resolved to prevent your computer system from any further loss.

It can either damage or corrupt or even delete your WLDCore.dll file. To fix this issue, first, you need to scan your computer system using your PC’s malware protection system. It will first find the issue and then resolve the issue. After that, if the file is corrupt, then you need to repair it, and if it is deleted, then you are required to install the whole program again.

Method 10 – Perform A Clean Installation of Windows

The next method is proven to be effective, but you should try this only when any of the other methods are not working for you. Before bringing this method into action, you should first back up all your relevant and important data, files, pictures, etc. So, that you can retrieve them back afterward. Afterward, you have to perform a clean installation.

It will be a time consuming step, and along with that, it will erase all the data present in your hard drive. Adding to your benefit will remove all the junk from your computer system and in turn, will make your computer ready to function as a normal one. As a result, it will fix the Windows 10 Random Restart Error or Slow Shutdown Error in your computer system.

It is the ultimate way to fix the WLDCore.dll is Missing Error in Windows 10. If not even a single other method works in your favor, still there is no need to get disappointed. You can implement this method, and this will resolve your issue.

Method 11 – Reinstall/Repair Applications

There is a method that will make you reinstall some of the applications such as Windows Live Mail, Windows Live Messenger, and Windows Live Contacts in order to fix the WLDCore.dll is Missing Error in Windows 10 of your computer system. You need to follow the below-mentioned steps to implement the process.

Step 1: Firstly, open the Start Menu and then in the search bar search for Control Panel.

Step 2: Then, in the Control Panel, click on Programs and Features.

Step 3: After that, programs and features list will open. Next, right-click on Windows Live Messenger, and if you have already installed it, then click on repair.

Step 4: By doing this, Windows Live Messenger will be repaired. After the repair, you have to repeat the same for Windows Live Contacts and Windows Live Mail.

Step 5: Finally, you have to reboot your computer system, and after that check, if all these applications are still present on your system or not.

Also Read:

Conclusion

In this article, you will find all the effective methods that are available to solve the WLDCore.dll is Missing Error in Windows 10 of your computer system. You need to ensure that you choose the right method and for that, first you need to go through the whole article carefully and then choose the best suitable method for your PC. The first method will itself the issue, but in case if it does not then, you can try the other method.

Critical Process Died Error in Windows 10 {Fixed}

0

The Critical Process Died Error is also known as the Blue Screen of Death Error (BSOD), which often happens when you are working on the windows and interrupt your work.

BSoDs are also known as stop error or stop codes and are the most annoying error you will encounter while working on it. Various typical causes may give rise to Critical Process Died error in Windows 10, such as software bugs, faulty memory, overheating and over-locking, power supply issue, etc.

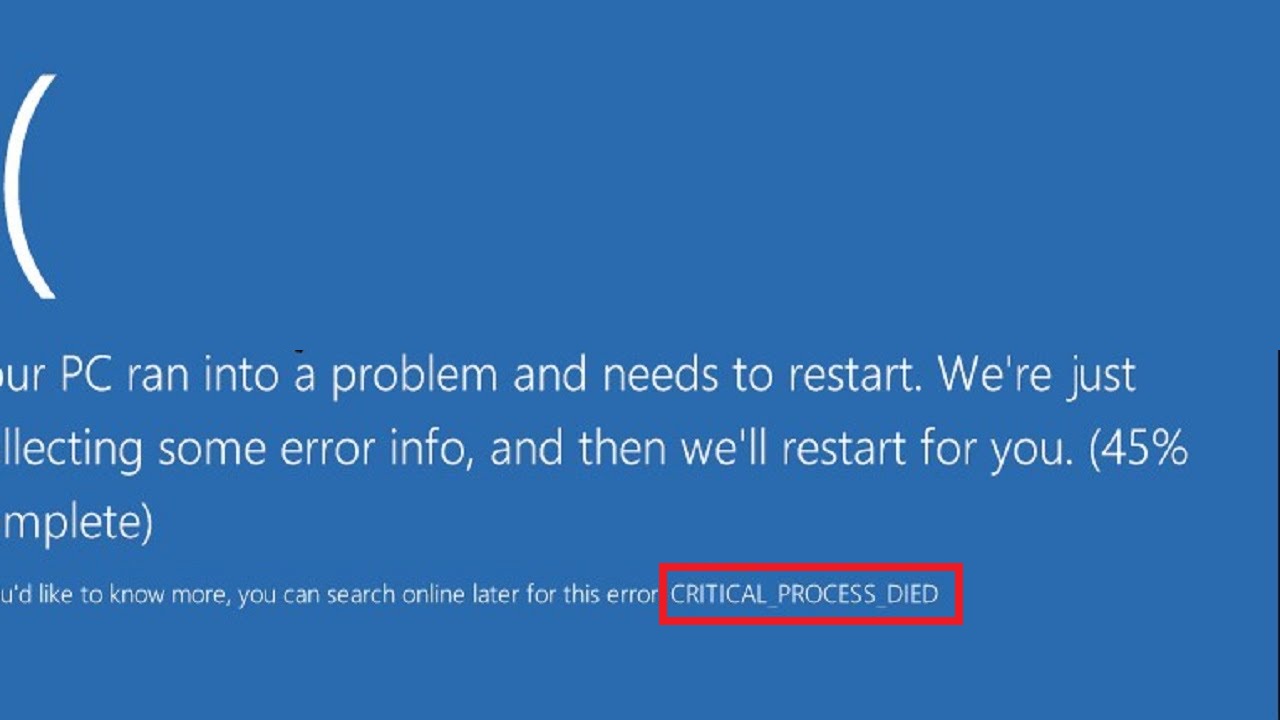
Critical Process Died Error

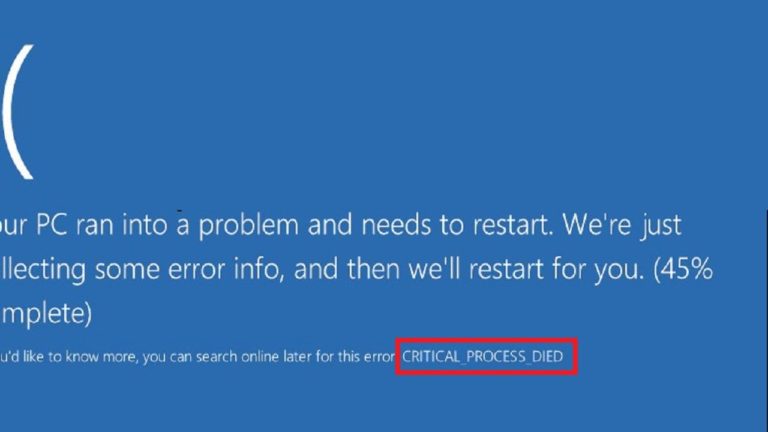
If you have ever encountered Critical Process Died error on your PC, then you must be aware of the fact that when this Critical_Process_Died error occurs, PC’s screen becomes blue and show the following messages:

  • Your PC ran into a problem and needed to restart. We are collecting some error info, and then we’ll restart for you.
  • If you would like to know more, you can search online later for this error; Critical_Process_Died.

Read Also:

  1. USB Ports Not Working
  2. Taskbar Showing In Full Screen

 Why Does Critical Process Died Error Occur?

As we mentioned above that there are various typical/ or technical causes, which eventually give rise to this error. However, the most obvious causes of this error are the following:

  • The primary reason behind this error we can say is Buggy Drivers.
  • Faulty Hard Disks and damaged files/ or documents.
  • Bad RAM, as well as Corrupt Windows Registry.
  • I am upgrading the windows from the old one to the latest one.
  • Miscellaneous such as power supply issues, overheating of RAM, hardware or software bugs, etc.

The deeper you go, the more complicated this error gets, and it becomes hard to pinpoint the actual cause for this error. However, there are several methods also to fix this error despite the cause, and in this article, we are going to share some of those methods which will surely go to help you fix this error in your PC.

How to Fix Critical Process Died Error in Windows 10?

Method 1: Uninstall Latest Updates on your PC

As we said that some software bugs could be the reason behind this error, thereby if you have installed any software update in your PC recently, it might be infected or corrupted by a virus. Thus, uninstalling such corrupted or infected software will ultimately fix this issue for you:

Step 1: Turn on your computer and navigate to your PC’s settings.

Step 2: In the PC’s settings, click on the windows update > followed by selecting the “Update History” option.

Step 3: In the update history window, click on the Uninstall Updates.

Step 4: Next, you will see a list of all the updates, from there choose the updates that you wish to uninstall > then click on the Uninstall.

Step 5: Finally, run the app that was showing error before to check if the error has solved or not.

Also Read:

Method 2: Disable Sleep Mode and Hibernate

Following steps will help you in performing this method:

Step 1: Start your computer and then open the Control Panel.

Step 2: Once you get inside the control panel of your computer, type Power Options, and click on it.

Step 3: Next, click on “change what the power button does” from power options > click on Change settings that are currently unavailable.

Step 4: You will be redirected to a new window, uncheck Sleep and Hibernate in there and save the settings.

Step 5: Restart your computer and check if the error is fixed or not.

Method 3: Run System File Checker

If the error has occurred due to some corrupted/ or missing files, then you can fix the error by running a System File Checker on your PC.

It will run a scan on your PC, and if any issue found, it will repair it automatically.

Follow the steps given below to try this method:

Step 1: Open the Start Menu and in the search bar type “cmd.”

Step 2: From the options that pop-up right-click on the Command Prompt > select Run as Administrator.

Step 3: You will be redirected to a new window, then type “sfc /scannow” and then hit the enter button.

Step 4: After you hit the enter button, it will take some time to complete the process.

Step 5: At last, restart your computer and do check about the error if it has been solved or not.

Method 4: Run DISM to Fix the Issue

DISM stands for Deployment Image Servicing and Management; this will help you to fix this issue by following the steps given here:

Step 1: Open the start menu and in the search bar type “cmd”> then select Command Prompt and then click on Run as Administrator.

Step 2: Afterwards, type the following commands one by one and then hit the enter button after each one of them:

  • Dism /Online /Cleanup-Image/CheckHealth
  • Dism/ Online /Cleanup-Image /ScanHealth
  • Dism /Online /Cleanup-Image / RestoreHealth

Step 3: Wait for some time and let the scan complete, once it’s done restart your computer.

Method 5: Run CCleaner and Antimalware

To perform this method, you need first to install CCleaner and then simply follow the steps mentioned below:

Step 1: First of all, Download & Install “CCleaner” and “Malwarebytes.”

Step 2: Next, scan your computer system to search for any corrupted files in your computer by using Malwarebytes.

Step 3: Malwarebytes will remove any possible corrupted files/ or malware is found in your PC’s operating system.

Step 4: Then, run CCleaner and mark all selections you want to clear from your PC’s Operating System > click on Run CCleaner.

Step 5: Wait for some time and let the process complete > click on the Registry Tab and mark all the selections you see there.

Step 6: Then run a scan on your PC using CCleaner by selecting Scan for Issue > click on Fix Selected Issues.

Afterward, a window will appear, choose Yes to back up your data.

Step 7: Select Fix All Selected Issues, after back up t is done > Restart your computer.

Read Also:

  1. 0x80070002
  2. MSVCP140.dll

 Method 6: Boot your Computer Clean or enter Safe Mode

It will help you by using the minimum set of drivers and start-up programs, which further help you fix the issue by minimizing any kind of software struggle/ or software related problem.

The following steps will help you perform this method:

Steps To Boot Your Computer Clean

Step 1: Start your computer and then open Run Menu > then type msconfig in the run box and hit the enter button.

Step 2: Next, you will see a services tab on your computer screen > click on Hide all Microsoft services > click on “Disable for all” option.

Step 3: Then, choose and click on the Open Task Manager, which you will find on the Start-up tab.

Step 4: Once you get inside the Start-up window, first click on the Task Manager, followed by (select) Each item > lastly click on the Disable option.

Step 5: Next, you can close the Task Manager and reboot your computer.

Steps To Enter Safe Mode

Step 1: After booting for a couple of times, a list will appear on your screen with three booting options.

Step 2: Next, navigate to Advanced options by clicking on Troubleshoot.

Step 3: Then, select Advanced options > select Startup Settings.

Step 4: At last, restart your computer > select Enable Safe Mode option.

Method 7: Restore your System

If the methods mentioned above do not work for you, then you can try this method. Restoring your system will help you fix this issue by removing the apps and programs you have installed recently if they are the reason behind this issue.

I will also help you by allowing you to get back on to the previous performance of your system. Follow the steps given below to try this method:

Step 1: Start your computer and then navigate to its settings.

Step 2: In the computer settings, select Update, and Security.

Step 3: You will be redirected to a new window, then select the Recovery option there (it will be in the left pane).

Step 4: Then, click on the Get Started option with Reset the PC option > select the option to back-up your files.

Step 5: At last, follow the steps showing on the screen and let the reset procedure complete.

Method 8: Update the Latest Drivers

Updating your computer’s driver is the most convenient way to fix Critical Process Died or Critical_Process_Died Error or the BSoD error. Also, keeping your computer’s drivers updated help to fix other software related issues also.

To update the latest drivers, follow the steps given here:

Step 1: Open Device Manager by pressing Windows + X key combination.

Step 2: You will be redirected to a new window with a list of drivers if you find any driver there with a yellow exclamation mark beside it. Then uninstall that driver and then reinstall it back.

Step 3: Next, right-click on the driver and then tick on the Upgrade Software check-box.

Method 9: Check your Disk for Errors

You can check your disk for errors by using command prompt, which can be done by following steps:

Step 1: Press the Windows key and then in the search menu type “cmd” and then from the options that appear, select command prompt.

Step 2: Right-click on the Command Prompt and the select Run as Administrator > login as Administrator.

Step 3: Then, in the command prompt window type the following command:

Chkdsk C: /f /r /x

 Step 4: f is to fix the issue; r is for repair, and x is to force the volume.

Method 10: Reinstall or Refresh the Windows

Finally, when no method/ or fix helps you to fix this Critical_Process_Died error, the last resolve is to reinstall your computer’s operating system. Before you reinstall the windows, be sure to back up your data in a USB drive or hard disk.

Steps To Refresh Your Windows

Step 1: Start your computer and go to the settings.

Step 2: Next, click on the Change PC settings option followed by selecting the Update and Recovery Option.

Step 3: Finally, click ok and let the process complete.

Anyway, if you choose to reinstall the windows, be sure to back up your data and then format the C drive in your PC specifically.

You may also like:

Conclusion

So, here we come to the end of this article, and the above-discussed methods are some the most convenient & easy to perform remedies. You can try each one of them as per your convenience to fix the Critical_Process_Died error in your Windows 10.

Always remember to follow each step carefully to prevent any more issues that might arise otherwise, and don’t worry if the Critical Process Died error exists even after performing one method; if one method doesn’t work, try another.